Configuring zsh
I’ve been using the Z shell (zsh) as my daily shell for over a year. Recently, I decided that I wanted to create my own shell prompt for zsh as I wasn’t pleased with the themes and configuration provided by Oh My Zsh (OMZ). I thought OMZ was unnecessary, and getting a better grasp of my system is always nice.
When creating the prompt, I thought about how and why I use Oh My Zsh. Sure, it brings me nice defaults and all these cool powerline prompts everyone seems to use and all,
but I don’t use most of the features.
I don’t even know all of the features. For example, OMZ comes with an enormous amount of aliases,
which I mostly don’t use or find hard to learn.
I used some git aliases, which were OK but easy to include in my .aliases file.
I decided to give manual configuring a chance.
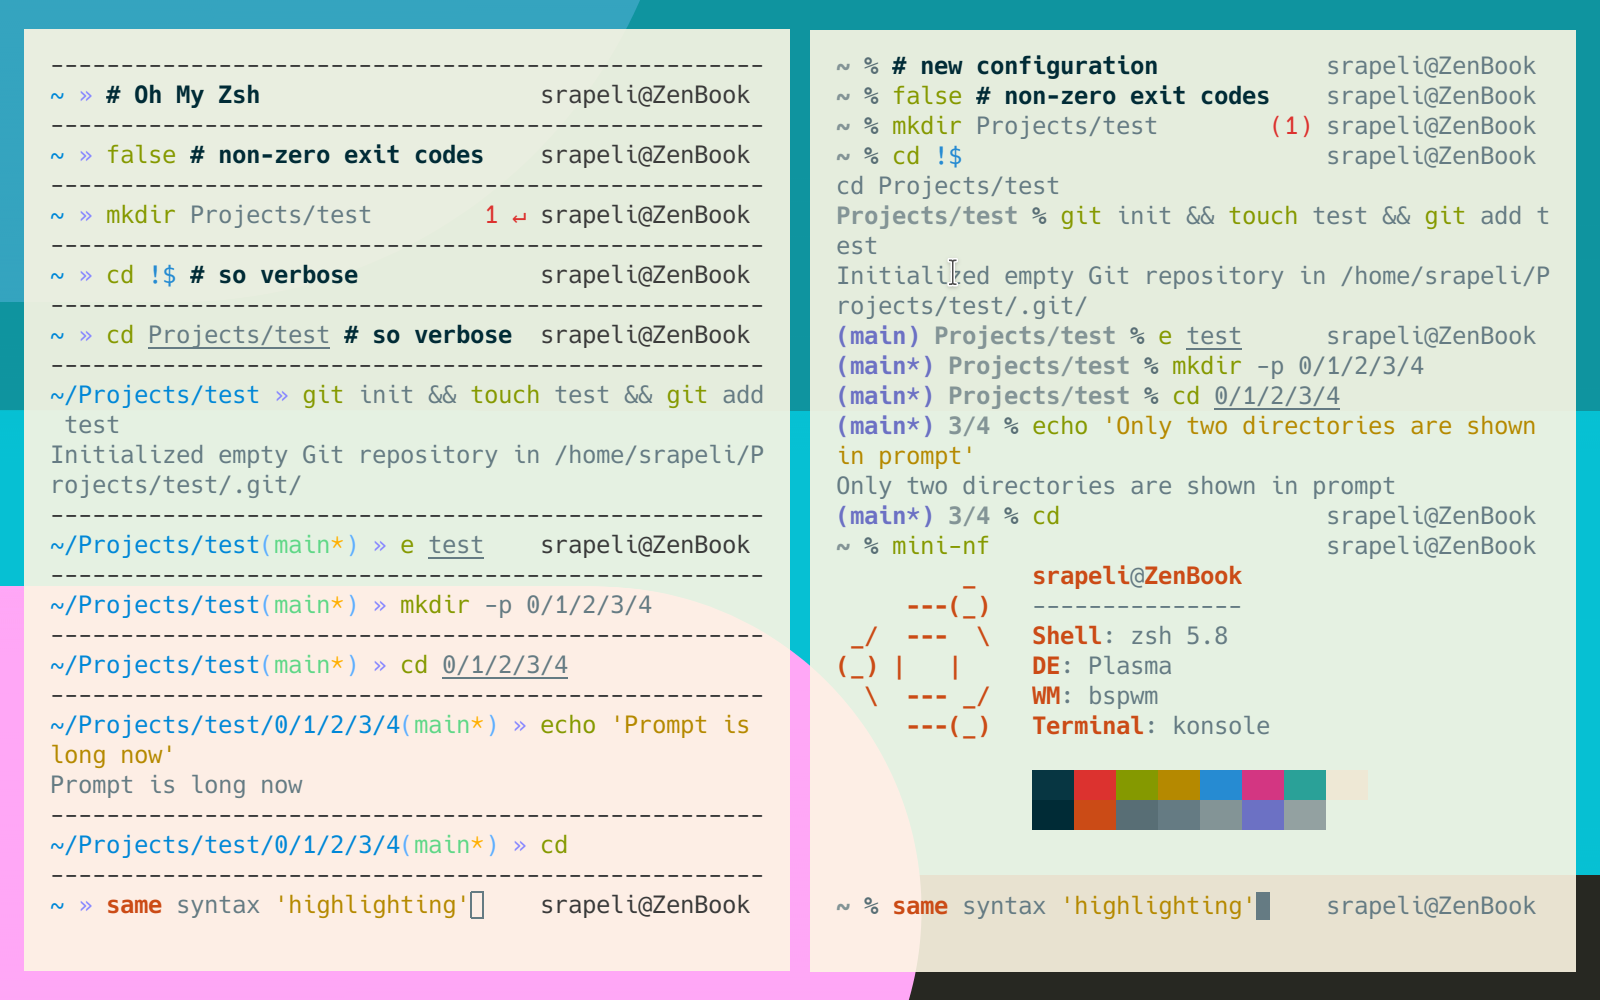
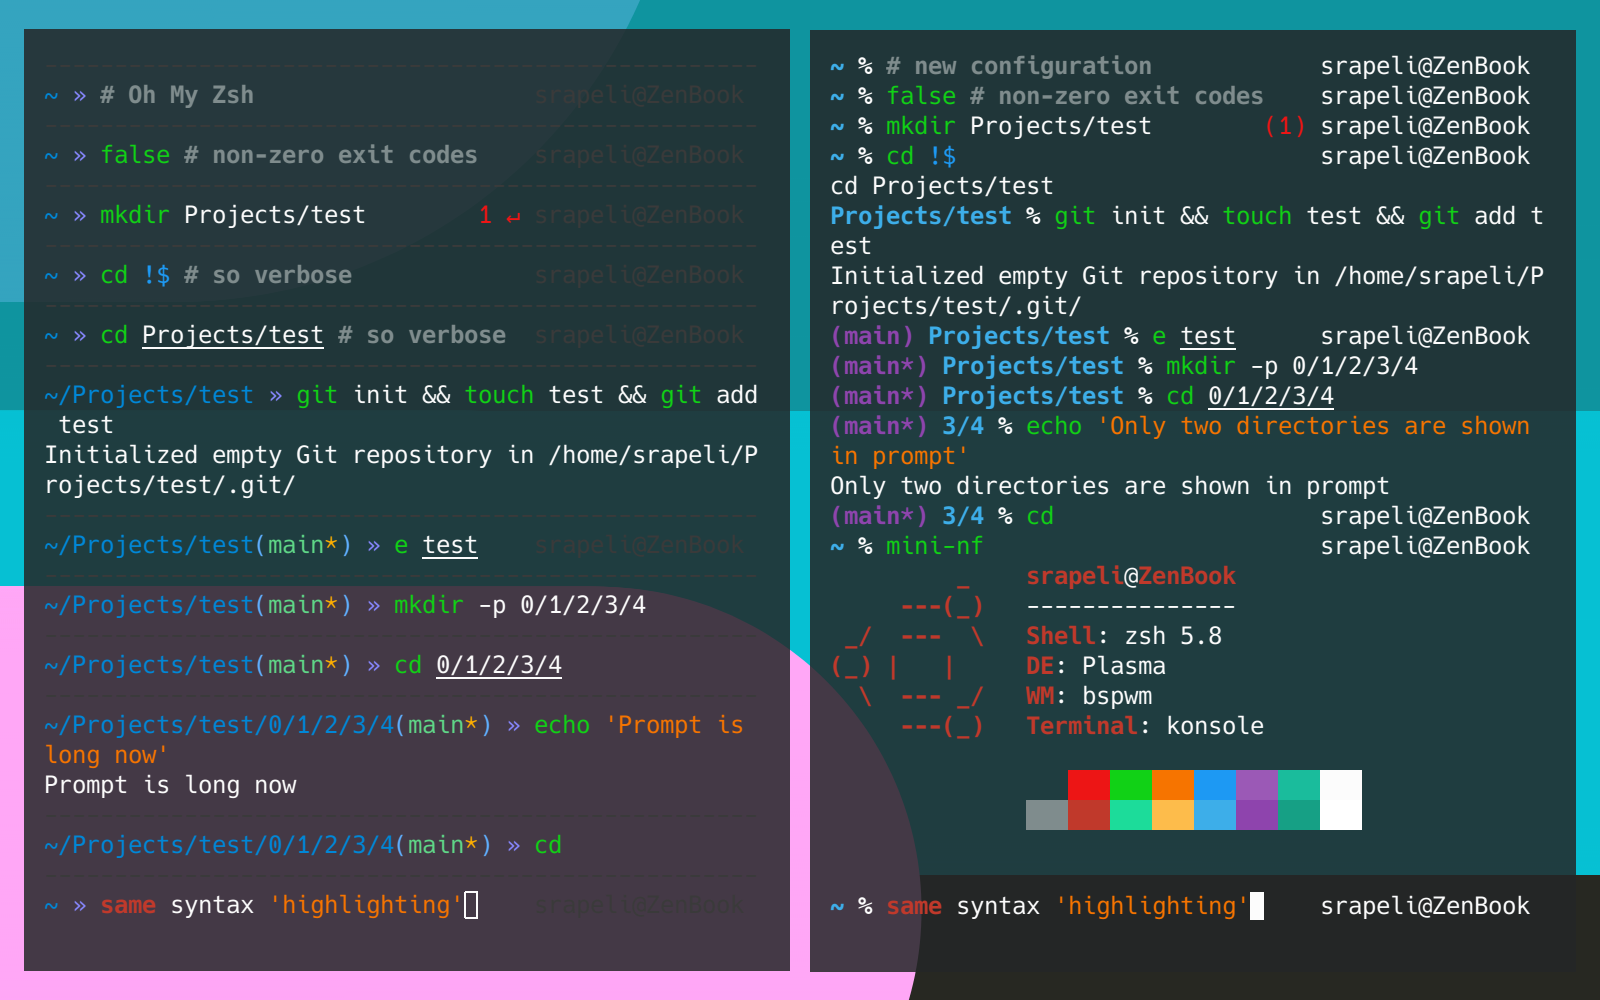
The OMZ theme used in the left terminal is af-magic. Complete configuration before adding the new prompt is available here.
The new prompt aims to be simple and clean yet informative. I’ll explain below what I did and why, but you can also check the dotfiles (link to commit, always latest version available here) directly if that’s what you fancy.
The prompt
I’ve split this section into two parts: design and implementation. In the design section, I’ll explain what I wanted to consider when designing the prompt. After that, I’ll explain the technical details related to getting the look and functionality I wanted.
Designing the prompt
I wanted my prompt to be simple, informative, good-looking, and portable.
I’ve had strange rendering issues on some environments, even with the af-magic prompt, which doesn’t even use powerline fonts, just an arrow », which I think is used for quotations in some languages.
It may not be common enough for some terminals, or there are other issues regarding the OMZ setup.
However, simplicity will make the prompt more portable as well.
My shell should absolutely work in the plain old Linux virtual console.
I could have a separate zsh config for those somewhat rare situations, or I could use bash, but if I can have all the good stuff, why break it with something I don’t need or even want?
I admit that there are some cool-looking shell themes out there, using custom fonts, emojis, and stuff, but I currently prefer the straightforward approach.
Simple things are often beautiful.
As the prompt should be informative, I thought that I should include these elements:
- current directory
- username
- hostname
- some git information
- python virtualenv status
I think the af-magic is a good theme, and my prompt is heavily inspired by it.
If colors are ignored, the basic prompt in the home directory only differs in two parts: the last (non-space) character is % in my prompt and » in af-magic,
and my theme does not have the line of dashes on top of the prompt, which enables me to see more lines at a time.
The difference can be seen in the above comparison screenshot, where I’ve run the same commands using both prompts.
I could run an extra neofetch command using my new configuration, as it consumes fewer lines.
There are, however, differences between the two prompts when navigating the file system.
My prompt stays relatively short, as it only shows the current directory and that directory’s parent directory, unlike af-magic, which displays the entire path from the home directory.
My git information may also not be as fancy as af-magic’s.
Implementing the prompt
Next, I’ll explain how I built the prompt and link some great resources that I found helpful. This section might be handy if you plan to build a prompt yourself, but if it feels too technical, feel free to skip to the next heading.
In zsh, the prompt is formed by defining variables PROMPT and RPROMPT. The first is the default prompt, and the latter is displayed on the right side of the terminal window.
I use PROMPT to display the current directory, git branch, virtualenv information, and the prompt character % for regular users and # for root. I use RPROMPT to display the user@host information, as well as the exit code of the last program if it wasn’t zero.
I’ve defined these variables in ~/.prompt.zsh, which I source in my .zshrc.
First, I configured the version control system information.
I’ve tried to explain what the commands do in the comments (lines starting with a #).
# setup git information
autoload -Uz vcs_info
precmd_functions+=( vcs_info )
setopt prompt_subst
# %b: branch
# %u: unstaged changes
zstyle ':vcs_info:git:*' formats '%F{5}(%b%u)%f '
# this makes %u work, but also the prompt is clearly slower in git dirs when this is on
zstyle ':vcs_info:*' check-for-changes true
# what string to use for %u when there are unstaged changes
zstyle ':vcs_info:*' unstagedstr '*'
# vcs_info supports multiple version control systems, but I need just git
zstyle ':vcs_info:*' enable git
In addition to zsh documentation, Arjan van der Gaag’s almost a decade-old blog post was extremely useful.
Previous setup lines are needed now when I define the actual prompt:
# Explaining prompt:
#
# %B / %F{n}: begin bold / color
# %b / %f: end bold / color
# %n~: display n latest directories of current directory
# %#: display a '%' (or '#' when root)
# %(..): conditional expression (see docs)
# %?: exit code of last process
# %n@%m: user@host
PROMPT='%B${vcs_info_msg_0_}%F{12}%2~%f %# %b'
# rprompt is located on the right side of the terminal
RPROMPT='%(?..%F{red}(%?%) %f)%n@%m'
I’ve now combined formatting and prompt fragments into a pleasant, complete prompt. Again, zsh documentation (this and other chapters) was valuable, but also this epic blog post by Armin Briegel and color cheat sheet by Jonas Jacek were great resources.
Plugin management
I tried zplug, but the loading time felt way too slow. I quickly asked the duck about zplug loading times and found this Reddit post that proved my hypothesis: zplug is slow, and better options are available. I decided to give antigen, which is said to be the de facto plugin manager for zsh, a try.
Antigen felt fast and usable, so I added it to my dotfile repository as a git submodule. That way, it is updated when I run my update script. I could have used the git submodule approach when adding any zsh plugins and skipped using a plugin manager completely, as I’ve done with vim plugins, but I reasoned that it should be easier with a plugin manager.
At the time of writing this post, I have two plugins in my antigenrc: a syntax highlighter and an autosuggestion plugin. Syntax highlighting can be seen in the comparison screenshot, and it quickly indicates when I’m about to mess up with quotes or do something illegal, like using a command that does not exist. Autosuggestions are handy as they can save me some keystrokes; more on that below.
Completion
There are three types of completion in my new zsh setup: tab completion, autocompletion, and history search. Tab completion is when I’ve written something and ask the shell to complete what I’ve started to write by pressing Tab. Autocompletion suggests complete commands I’ve previously used, and history search does the same. More about those below.
Tab completion
I don’t always know the exact filenames or remember all command options, but that is something where zsh’s built-in completion can be beneficial.
There are many options and completion strategies to choose from.
I used the command compinstall to create
a completion configuration file.
Some people think it’s difficult to use, but I believe it was undoubtedly more straightforward to use that than learn the correct configuration file syntax.
Completing partial file paths is a really powerful feature. Below, I have two examples of completing partial paths.
Changing directories
I can exploit the clever completion if I want to go to the directory test, which is located inside Projects in my home directory.
I have a demonstration of that below, where ↹ represents pressing Tab.
~ % proj/t↹
~ % Projects/test/
When pressing Enter to execute the line, zsh will take me to ~/Projects/test/ with less typing.
This example also takes advantage of one nice feature of zsh: one can type the directory name directly to the shell and omit the cd command completely.
This feature has to be turned on by setting the option autocd.
Editing a file
I often don’t remember the exact name of the file that I should, for example, edit with my favorite text editor (thanks for asking; it’s Neovim).
I often still know at least some part of the filename without cheating with ls.
I can write that part, hit the Tab, and have zsh complete the filename.
Here is a toy example of such a situation: I don’t have to remember the numbering included in filenames.
~/blog-demo % ls
01-beginning.md  02-middle.md  03-end.md
~/blog-demo % e mid↹
~/blog-demo % e 02-middle.md
So convenient!
Autocompletion
As I stated earlier, this functionality comes from a plugin. I haven’t ever tried the Fish shell, but apparently, it has this nice auto-completion feature implemented in a zsh plugin. The plugin suggests commands that match what the user has already written to the command line, and the suggestion can be accepted by pressing ➡. There are some configuration options that I haven’t sunk my teeth into, as the defaults seem pretty good. However, I did make zsh accept the suggestion by pressing Ctrl + P, a bit like when asking Vim for suggestions.
History search
This is a feature I fell in love with when using OMZ: when writing the beginning of a command to the prompt, I can press ⬆, and the shell completes the command with what I’ve used previously. I can further explore the history of commands beginning similarly by pressing the key more times. History search is fantastic when I know I’ve typed a long command earlier and don’t want to guess the correct parameters once again.
I was surprised that this functionality is provided by zsh directly without any third-party plugins, just like the powerful completions I mentioned earlier.
Efficiency
The startup time of a shell is essential. I don’t want to wait for my shell to load after opening a terminal emulator.
I was pretty happy with the loading time of my previous configuration with Oh My Zsh, so the new configuration must not be any slower.
I did some loading time measurements using time zsh -i -c exit (from the previously linked Reddit post) with different configurations.
I also included results of sh, bash, and zsh with (Ubuntu’s) default configurations for comparison.
| shell | loading time |
|---|---|
| zsh (OMZ) | 115 ms |
| zsh (new) | 104 ms |
| zsh (new, no antigen) | 95 ms |
| zsh (no config) | 7 ms |
| bash (default) | 38 ms |
| sh (default) | 4 ms |
The results are interesting: my new configuration isn’t much faster than my previous configuration using OMZ. The antigen plugin manager really is fast: with two plugins, the loading time doesn’t increase much. But plain zsh without any configuration is blazing fast, just like good old sh—the loading time is practically instant. The prompt appears right away as one opens up the shell. Bash is pretty decent, too. Sadly, you can’t have all the nice features with a rapid startup. The 0.1-second starting speed is fast enough for me, and I don’t need to compromise on the features.
Final thoughts
I now have much greater control and understanding of my shell. I understand which part of the shell is responsible for what, and it is easy to read that part’s documentation to learn more. Using something you’ve made, or at least thoroughly configured yourself, is always lovely. I know where to start after this experience if the setup needs further improvement.
I don’t think I’ll miss Oh My Zsh, but it provides ease and quality of life features that “just work,” and OMZ can be an option in the future. However, I’ve achieved at least the same level of usability by configuring the shell myself. I feel ownership regarding it, and it was an exciting and educative journey.
Did you like this post?
I'll announce new posts in the following channels:
See my blog's front page to read my other posts.
You can reach me on Mastodon: @sampo@hachyderm.io. I'd love to hear from you!